
SolidTA tutorial
Mastering a tool as complex (and ambitious) as SolidTA is not easy. Many users (including students, professionals who used it in the IT industry, and researchers) have struggled with the various steps required to get your data, analyze it, and produce the desired visualizations to draw the required conclusions.
Below we provide a short tutorial on how to use SolidTA for several concrete tasks done on several real-world repositories. Be sure to read this information before you start with your assignment, as this will save time and reduce pain!
Note: The examples below have been all tried on Windows Vista 32-bit, using the SolidTA distribution from Tools. We tested all these examples from scratch (i.e., installed SolidTA, then connected to the repositories, then got the data), so as to have no side-effects.
A. Installation
First of all, get the SolidTA tool (see the Tools page). Make sure you read all details on that page, as there are several distributions of SolidTA. Basically, they're all identical, but some come with more pre-analyzed data, others with less or no pre-analyzed data. In the following, we assume that you have installed a raw copy of SolidTA (with no pre-analyzed data).
B. First steps
In this section, we present the first steps of setting up an analysis project with SolidTA. In the next section (C), we show an actual full-fledged analysis example for an example repository. Read both steps B and C before you start your own analysis!
B.1. General points
- Any of the repositories named below can be used to actually complete your assignment. These are full-fledged repositories, not just toy examples to play with.
- However, if you want, you can use these repositories just as an example to start learning how to use SolidTA to do repository mining. You can then use any other similar-size repository to do the same steps.
B.2. Size matters
The analysis and data acquisition time depend heavily on several factors which you need to understand:
- the size of the repository: more files and/or more revisions == more time to get the data and to analyze it
- slower server hosting the repository is hosted and/or slower internet connection == more time to get the data
So, for optimal performance, you need
- a good net connection:)
- select a repository which is either not too big or else select a subset of its files/folders to get data on and analyze further.
- do not do all the analysis steps brute-force on the whole repository (see more below)
B.3. Repositories
A few good examples for your assignment are given below:
- wxWidgets: A cross-platform GUI toolkit, mainly C/C++
Address: http://svn.wxwidgets.org/svn/wx/wxWidgets/trunk/src/common/ - Chromium: A cross-platform web browser, mainly C/C++:
Address: http://src.chromium.org/svn/trunk/src/chrome/common/extensions/ - Subversion: The Subversion tool itself, mainly C/C++:
Address: http://svn.apache.org/repos/asf/subversion/trunk/subversion/ - Gimp: An image processing tool, mainly C/C++:
Address: http://git.gnome.org/gimp
B.4. Setting up the data acquisition
- Start SolidTA
- Press New to create a new project. A project holds the repository coordinates (address, username, etc), all the data you get from it, plus all subsequent analyses (metrics) you compute on that data.
- In the popup window appearing, give the coordinates for a repository. These are:
- the project name. This is just a local name for you to recognize the project, e.g. MyFirstTry or something like that.
- the project type. Since all repos above are SVN, select SVN here.
- the repositorry address. This is a URL-like address containing the folder in the repository which you want to analyze. You can freely select any (sub)folder you want, so you don't have to select the whole repository (which may be large). For instance, for wxWidgets, we select only the src/common subfolder, which is far less than the whole trunk. Be careful when you specify this address! Don't prefix it by the protocol (e.g. http://), and end it with a slash. Thus, for the above example (src/common), you need to enter: svn.wxwidgets.org/svn/wx/wxWidgets/trunk/src/common/
- eave the "User name" field empty. This means you use the 'default' (anonymous) user, which most repositories support. If however the documentation of the repository specifies something else, e.g. that you have to use the username guest, then give here this username.
- press OK.
- Next, select the new project (e.g. MyFirstTry) in the toplevel list of available projects. Then press Load. You will not see anything, of course, since you didn't acquire any data yet. However, now that project is active, so you can start adding data. If, at this step or later, a popup window prompts you for an username/password, just press ESCAPE (meaning, use the defaults).
- Press Update file list. This will start requesting info from the repository on all files under the specified path (src/common in our case). You'll see a 'connection' animation in the main window. This should not take long. For wxWidgets above, it takes around 2 minutes. After this step is ready (animation off), you can press Command log to see what happened. You should see here several messages (you don't need to understand them), but no warnings/errors. These indicate there was some dialogue with the repo, and all ended OK. Also, you should see a file/tree list in the left window, which shows all the files/folders which SolidTA found under the indicated repository path.
- Select a set of files you are interested on, and press Update version list. This gets all the change-moments, and authors who committed these, for the selected files/folders. Typically you can select here the entire set of files which exist in that window. You can do this either by selecting the top folder, or, in the selections window above, select "/" (which means the same: all files/folders). This step may take a bit longer (5..8 minutes for our wxWidgets example). At the end, you can already see several things. For example, you can select a metric (from the available ones), and next visualize that metric on the files for which you have acquired information. See the SolidTA manual more on how to select a metric and visualize it. Also, during this step, you can press Command log at any time to see what is happening at that moment, so you get an idea of the speed of the process, if there are any problems, etc. Press ESC to close the Command log.
Note that, in the file/tree view, the files for which you have revision information, have now a pink box at the left. If all files are pink, you know you have revision information for all the files in your project. - Select a set of files you are interested in, and press Update contents. This is the slowest step. It gets all file contents for the selected files, and all their revisions (which we know from the previous step). We recommend here selecting just a few files at the beginning, say 2..5, just to see how slow this goes. Best is to select a few source files (e.g. C/C++), as we know these are typically not too large. When the content acquisition is done, you'll see the files for which you have content marked by a green box in the file/tree view.
B.5. Other repository types
SolidTA can analyze repositories of several types: SVN, Git, and CVS. Information on SVN is given above. For Git, read below:
- Git client: SolidTA uses a third-party tool (git command-line client) to connect to a Git repository. So, for SolidTA to work, you need to install such a tool on your machine before starting SolidTA. An easy to install Git client is msysgit (google for it, it's very easy to find). We tested version 1.7.11. Installation works easily. However, be careful to select the option to integrate the git shell tools into the PATH environment variable (so SolidTA knows where the git tool is). For the rest, you don't care about msysgit, it's used internally.
- Getting the data: Use the same procedure as for SVN, but select Git as repository type. For the protocol, you can select Git, if the address of your repositories starts with git://, or HTTP, if the address starts with http://. As for SVN repositories, use an existing username/password, or if in doubt, keep it empty (i.e. anonymous)
- Acquiring data: Same as for SVN: Update files, revisions, contents. Note that the process, internally, works a bit differently than for SVN, which implies some speed differences. Git first gets a 'clone' (checkout) of the remote repository. That takes a while (2..3 minutes for a mid-sized repository). After that, getting revision information takes roughly the same amount of time, maybe a bit less, than for SVN. However, updating the file contents is way faster - probably 100 times or so! This is so since most of the information is stored in the local clone, and also because Git uses a compressed data-transfer protocol.
- 'Trying it out: A very nice repository is Gimp, an image processing/editing tool. The full update of files and revisions takes about 10 minutes. Updating files is also fast: roughly 5..8 seconds/file! Also, Gimp contains a very long history (over 10 years), many contributors, and lots of C files on which the metric extraction works very very well.
C. Example: Analysis of Chromium
For the sake of example, let us say we want to analyze the Chromium repository. This is a Subversion (SVN) repository.
Step 1: Creating a new project
First, you need to create a new project in SolidTA. Several settings are important here:
- project name: You can give this project any name you want.
- project type: SVN. This tells that the repository SolidTA will communicate with is a Subversion repository. SolidTA supports also other repository types (see more below).
- protocol: http. This tells that the transport protocol between the repository and SolidTA will be HTTP. Some repositories allow several types of protocols. A simple rule of thumb is: if the repository is browsable via a web browser, then it almost always supports HTTP as protocol.
- URL: src.chromium.org/svn/trunk/src/chrome/common/extensions/. This is the directory from the repository which we will analyze. Several points are important here. First, you can (as in this example) analyze only a subset of a repository. This is very useful for large repositories. Always try to analyze a small(er) subset of a repository first, especially if you know that the repository is too large. Otherwise, the analysis may fail, e.g. because of the server timing out certain requests.
Step 2: Getting the data
After you have successfully created a project, you still do not have any data to analyze. SolidTA gets this data incrementally in three phases:
- file list: In phase 1, a list of all files having been added to the repository (and part of the indicated directory in the project settings) is obtained. This phase is relatively fast, since only a file-list has to be transferred from the remote repository to the local SolidTA client. For the entire trunk/ directory of Chromium, this takes about 10 minutes on a broadband connection. Hence, you can safely execute this phase even for a high-level directory in the project tree.
- revision list: In phase 2, a list of revisions is acquired. A file revision contains the revision moment, who committed the revision, and some metadata like commit logs. Obviously, this phase is slower than phase 1, since we have the same amount of files, but a file can have hundreds of revisions or even more. The speed of phase 2 depends largely on the number of revisions in a repository. For Chromium's trunk/, acquiring all file revisions takes around one hour. In this phase, you may notice some timeouts (SolidTA aborts the data acquisition with an error message). This is so since some SVN servers allow a maximal connection duration, for security reasons. Now, the get list of revisions operation is in that sense atomic (login, plus a lot of queries). So, if SVN times out, say after 1 hour, SolidTA is left most probably in an unstable state or it may even crash.
Solution: Don't attempt to do a get-list-of-revisions for too many files at a time! Select a subset of files or directories (say 10..100), and get the revision list for a chunk at a time. - file contents: In phase 3, we get the actual contents of the revisions of all files found in phases 1 and 2. The speed of phase 3 depends largely on the number of revisions and size of these files. This is by far the slowest step in the process. You should not even attempt to do this for the entire trunk/. For the smaller subset trunk/src/chrome/common/extensions/, given here as an example, the content update takes a few hours. As for phase 2, try this procedure incrementally, on not too large directories or sets of files.
Notes
- when trying to update content for a file whose type is not recognized by one of the analysis plugins in SolidTA, you get a message "content not supported/binary". This is expected and not a problem. It means that the content for that file won't be downloaded, since there is no analysis able to handle that file format. Examples are binary files (.exe, .dll, .lib). Files which can be analyzed are various types of source code (.c, .cpp, .h, .java, and a few more) and various types of text/script files.
- if you get a timeout, you'll see some SVN messages in SolidTA's Log window stating that. The chances are then high that SolidTA's database is unstable, so you cannot guarantee anything next. Thus, best is to update in small bunches.
- if, for any reason, you suspect that a project in SolidTA got corrupted, just delete the project and start a new one. Alternatively, you can start a new project and try to re-update the old project later. Of course, it is possible to have several analysis projects set up on the same repository.
- in Chromium, we sometimes see some very surprising messages of the kind file ....<name>... not found. Surprising! Let us next examine Chromium using a web-based repository browser. Go to http://src.chromium.org/viewvc/chrome/. The puzzle is now explained: Apparently, this repository has been moved or reorganized a few times. Hence, some revision numbers, as reported by SVN, are actually incorrect! Is this a problem? Not if only a few files in a repository show this wrong behavior. Simply eliminate these files from any further analyses, using the selection mechanism in SolidTA.
- the analysis of src.chromium.org/svn/trunk/src/chrome/common/extensions/ (which has few sources!) already occupies something like 40MB of disk space. Hence, be forewarned that analyzing large repositories will be slow and take up quite some disk space.
Step 3: Incremental analysis
You can always add more data to your analysis by selecting a file or set of files in SolidTA's tree view and asking for an update of the revisions or update of the contents. This is the best way to test all is working OK:
- select just 1 file (say, some .cc or .h file)
- perform the revisions and contents update
- monitor what happens in the Log window.
If something wrong takes place, examine the commit logs in the web-based SVN browser to see if there are any messages on repository relocation, version renumbering, etc. If so, you know what happened, and should just ignore that event, and proceed to the next file(s).
Step 4: Content analysis
Once you have phase 3 done for one or more files, you can select these and compute a few content metrics. The simplest and fastest is the Lines of text counter. For this:
- go to Calculators
- select the desired metric 'calculator'
- make sure that your files of interest are selected in the tree view
- press Generate in the calculator.
This is relatively fast (minutes for hundreds of files, proportionally so for larger sets) since all content is locally available. After this phase is completed, if you go to the Metrics tab, you'll find some new metrics.
Note: Even if the content acquisition failed on some revisions of a selected file, the metrics will be still computed for all revisions which we could download.
Results on Chromium
The images below show some snapshots from the analysis process described above for the Chromium repository. You can open each image in a new window to see it at full resolution:
Files and authors

Overview of the analyzed subset of files, sorted by creation date, colored by authors. In the treeview, you see several pink icons. These are files for which not all the content could be downloaded, due to the problems with repository structure indicated above. The green ones are files for which all repository content was downloaded OK.
Files and file type
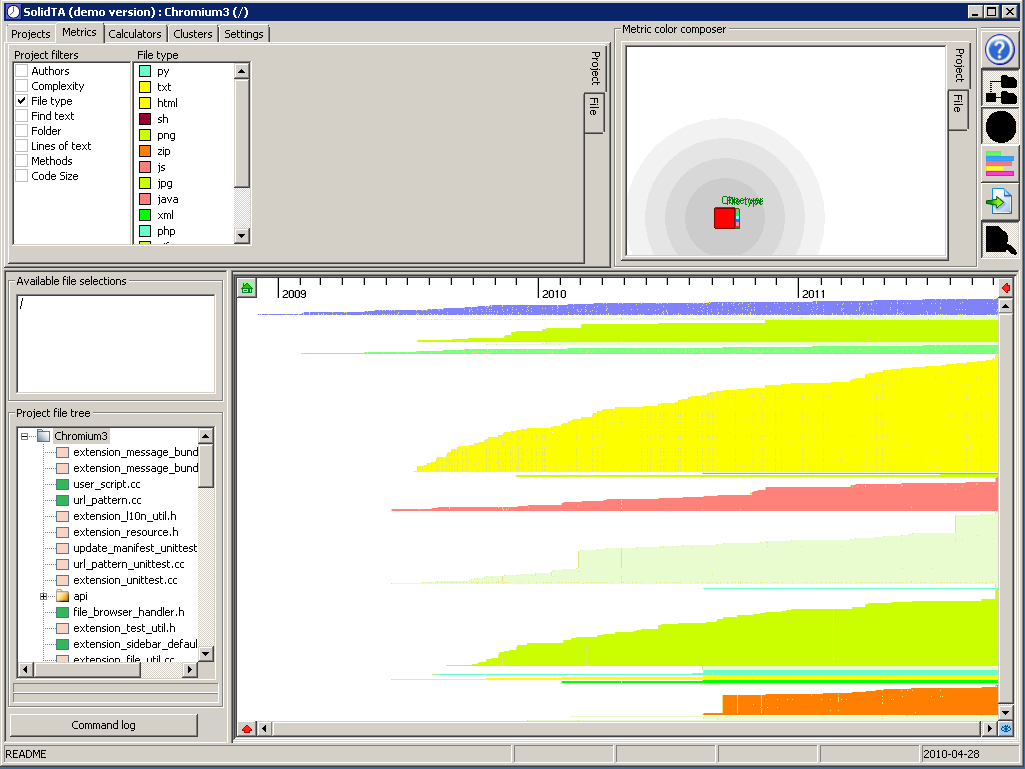
Overview of the analyzed files, sorted on creation date, and grouped and colored by file type. Blue (top) are .cc. Green (3rd group from top) are .h. Yellow (largest group) are .html. Red are .js. Orange (bottom) are .zip. This is to show where we expect to have source code level metrics (thus, this directory won't have many, since there are only few source files).
Files and code size
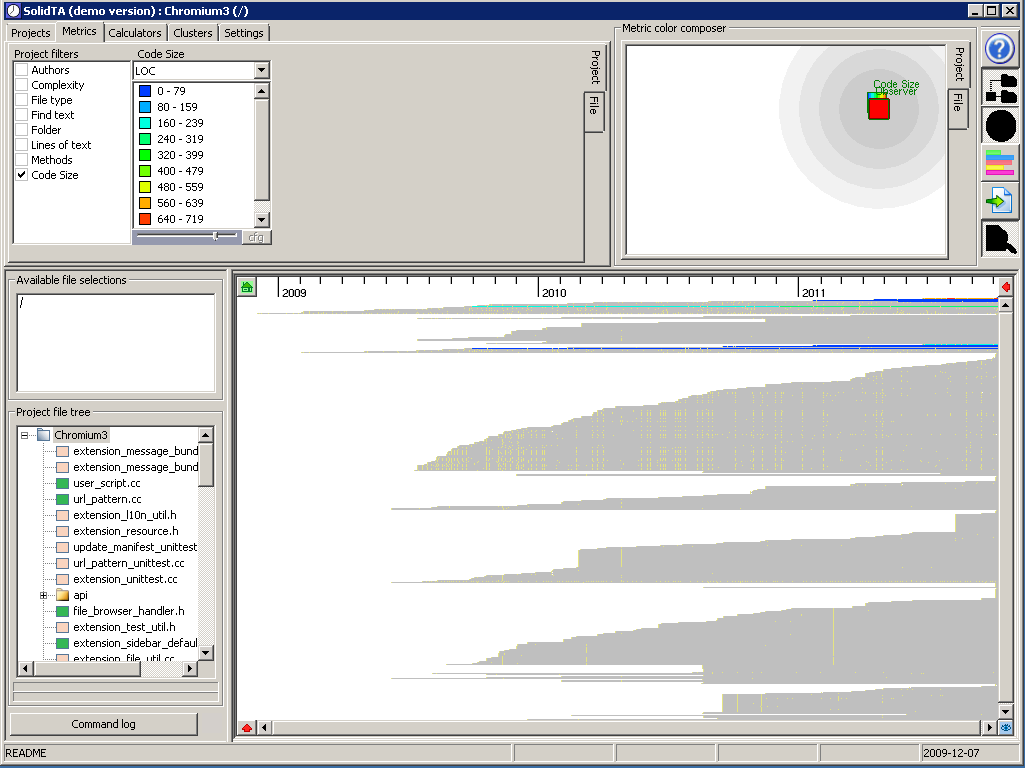
Same sorting as before, but now colored by code size. As you see, only few files have the code size computed. This is because in our experiment we didn't update the content for all source files, but just for a few. The code size is computed by the CCCC metrics engine (see the Calculators tab). Of course, you can choose more files to update the contents and then compute metrics.
Files: a detail
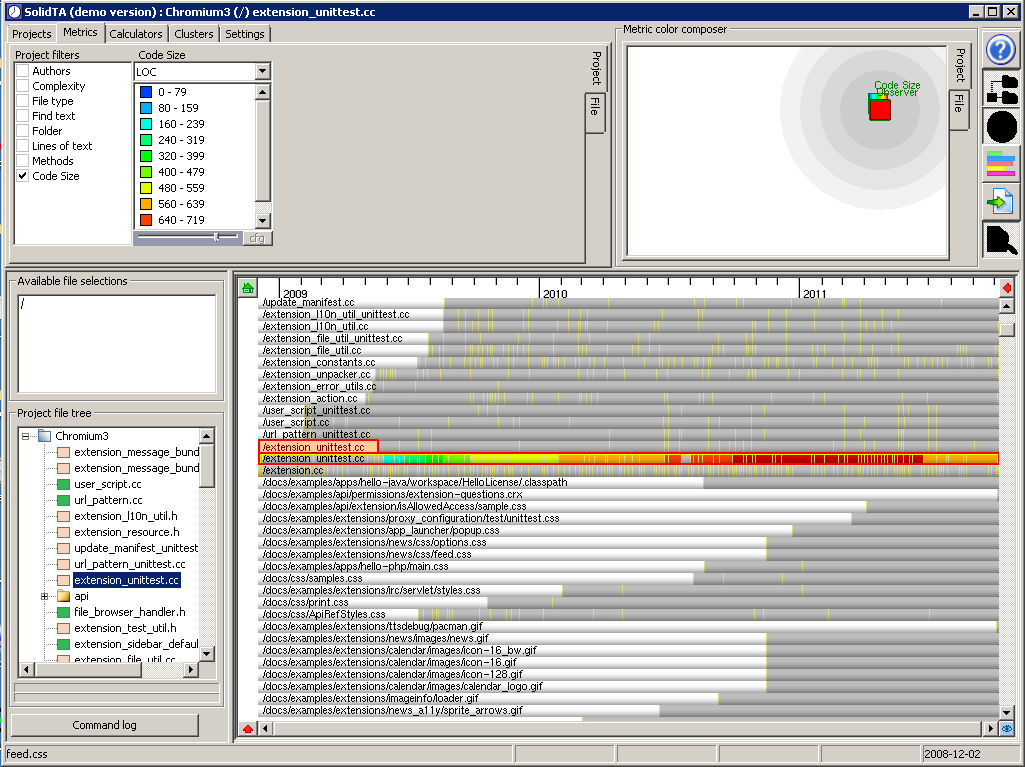
A zoom-in as in the image above, focusing on the file extension_unittest.cc. As you see in the tree view, this file's icon is pink meaning not all content for all revisions was gotten OK. Now if you focus on the main view, for this file, you'll see lots of colors in the bar, but also some gray blocks. These blocks are the revisions for which SolidTA was unable to download content because of the earlier indicated problems. Which shows that you can have partial analyses for certain revisions, you don't need them all.
Get the Chromium pre-analyzed data
A full snapshot of the Chromium pre-analyzed data (including the SolidTA tool itself too) is available for download. You can easily install this snapshot to e.g. generate images similar to the ones shown above. For details, see the Tools page.